
Dah lama gak akuseniman tak post pasal tutorial photoshop ni!
tetiba teringin lak nak buat tutorial pasal "beam"
dah!
malas nak cakap panjang!
jom start!
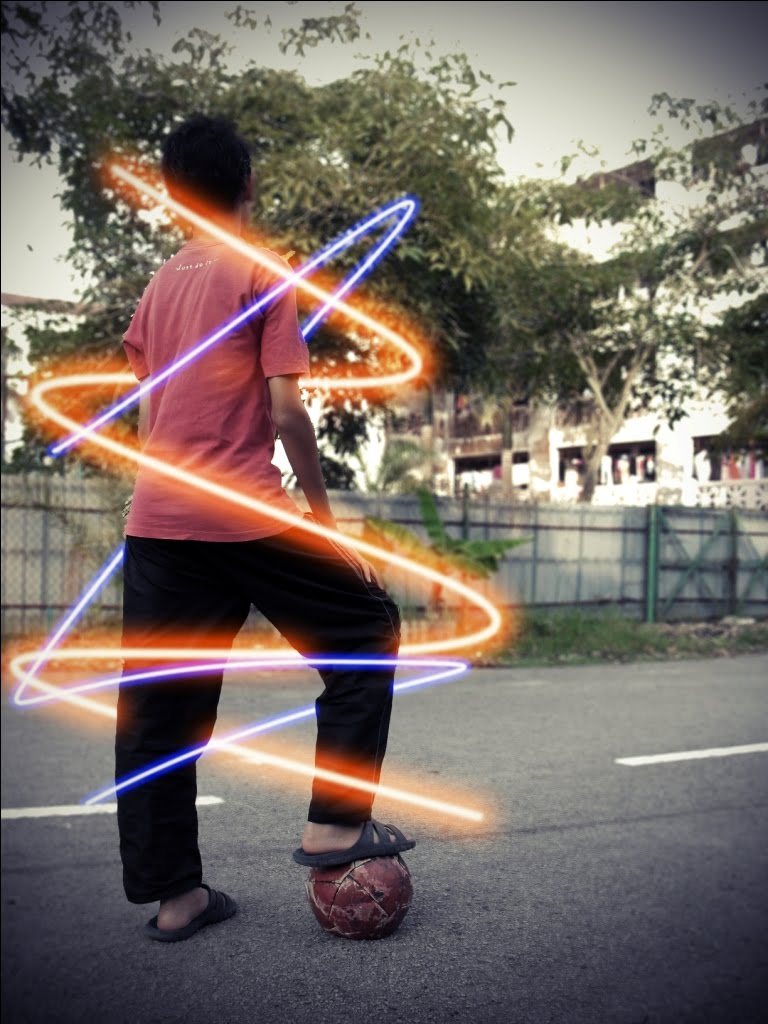
sebelum tu,
kita tengok dulu hasil tutorial:)

apa macam?
masyuk?
let's start!
1st step:
-open adobe photoshop.
-open new file.(ctrl+n)

-set all the settings like above then click ok.
2nd step
-fill the new file with black colour using Paint Bucket Tool.

-then,create a new layer.

3rd step:
-from now we will use the new layer(layer 1) only!
-dont bother the background layer!!
-next,we're gonna use Pen Tool.

-make sure you follow the settings in the picture above
-draw line using the Pen Tool.

-you can follow the line above:)
4th step:
-click on Brush Tool.
-go to the photo and right click.

-a window like in the picture above will apear.
-set the settings like above and choose the round brush.
5th step:
-next,set the foreground colour to white colour.
(you can find it at the bottom of tools window)

-now,click on the pen tools again!.
-go to the photo and right click.

-a window like in the picture above will apear.
-click on Stroke Path.

-sa window like in the picture will show up.
-choose brush instead of pen.
-make sure you check the Simulate Pressure then click ok.
-click enter to see the line.
6th step:
-go to layer palette.
-right click on the "layer 1" and then right click.

-click on Blending Options.

-a window will appear.
-check the Outer Glow box and double click the tab!.
-set the settings as above.
-You can choose any colour you want:)
-and you are done:)
-yay!at last!
-thx to akuseniman:)!
-this is the basic.
-manipulate it to get more interesting outcomes(^_^)
-ask me if you have any probs.
-do drop your comment ok?
caiyok!
___________________________________________
-the outcome after multi copy the "layer one"
and do some colour changes.
-apply this basic step in a picture.
-gonna look more interesting.
13 comments:
nice bro..tpi yg mamat tu xnice...ade ke pkai slipa...xstyle
Niceee~ ;)
bagus arr tutorial ni...dalam laptop ade photoshop tp x geti guna..huhuhu...
wow..nice info....thanz ya..i will try..huhuhu..:)
haha.
adek aku la ahnaf!
tgk la!
bola pon pancit!
mia oh mia!
thx yah!
try la!
aku nk thu jd o x!
mne la thu ajaran sesat:)
huhuh.
jaja.
blaja la slow2:)
ade 7 stkt ni tutorial photoshop kt blog ni:)
thx july!
da jd nnt,bgtau k?
thx ol!
waaaa kelas gitu nak buat nak buat
aku dh bole wat macm ni...aq tngh try wat pic yg nampak real macam air or asap...tp blum jd lg...
yang aasap uh nk jd dh,tp dye nmpak sngat mcm compter mcm dalam game gituu..
klow tow ajerin dongggg...
trimas dgn tutor ni..jasa mu dikenang..ahaks
ohho nk try lah nnt.baru blaja ps nih...thanks 4 sharing..
haha.
bwat la mis havoc!
simple je.
cm air?
bg gmba contoh mat!
miro!
thx bro!
support2
buat gamba rasengan kt tapak tgn...cepat ak nk tgk
haha nice one cad! =)
err, apsal full english? tak berapa faham. hehe.. sorri but, u terangkan tak berapa jelas la.. :C
Post a Comment